 |
 |
 |
A.L.S Communication device using ArduinoRicardo Andere de MelloINTRODUCTIONThe father of a good friend has ALS (Amyotrophic lateral sclerosis) and recently things got more complicated, with great loss of his movements.I wanted to help, so I did some research in ways to enable him to keep communicating with his family. I have some electronics knowledge, so I thought I could use some common components I have laying around, and the result is this small project. Feel free to use and ask for information about how to do it. |
Dispositivo de comunicação para E.L.A utilizando ArduinoRicardo Andere de Mello INTRODUÇÃOO pai de uma grande amiga tem ELA (Esclerose Lateral Amiotrófica) e recentemente as coisas se complicaram, com uma grande perda nos movimentos dele.Eu quís ajudar, então pesquisei maneiras de permitir que ele continuasse se comunicando com sua família. Eu tenho algum conhecimento de eletrônica, então pensei que poderia usar alguns componentes comuns que tenho aqui em casa, e o resultado é este projeto. O projeto é aberto e se precisar de ajuda para montar é só pedir. |
| |
|
|

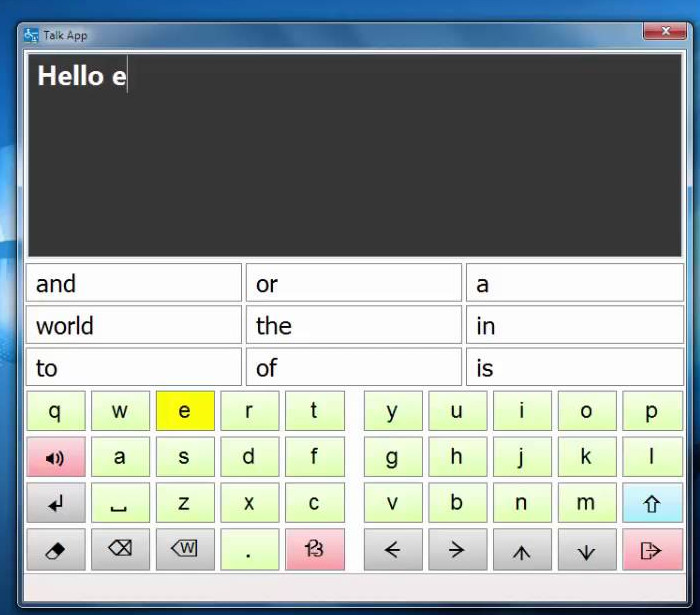
COMMUNICATION SOFTWAREThe communication software I have chosen is the same used by Stephen Hawking, gently developed and open-sourced by Intel. |
SOFTWARE DE COMUNICAÇÃOO software de comunicação escolhido é o mesmo utilizado por Stephen Hawking, gentilmente desenvolvido e disponibilizado como código livre pela Intel. |
| The
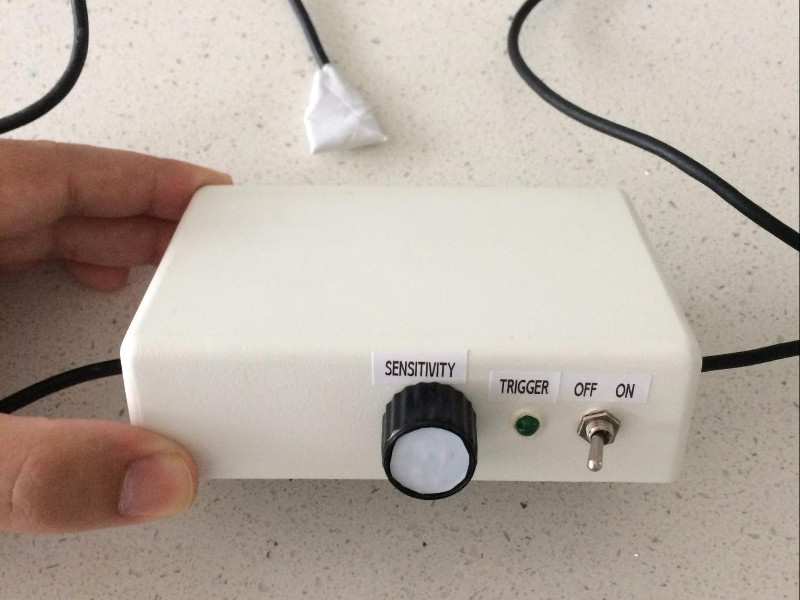
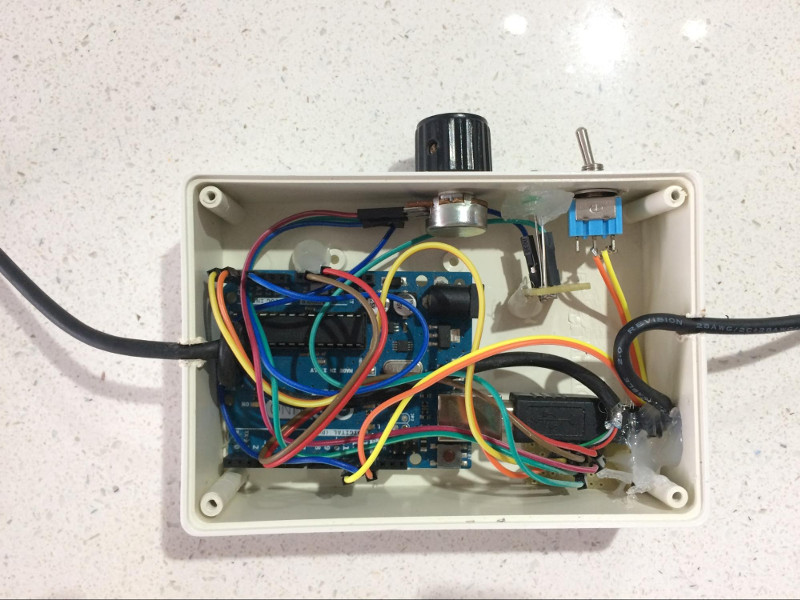
software name is ACAT and can be downloaded here: https://01.org/acat/downloads There are support for other languages than english, like brazilian portuguese, my native language. The software is actually simple, there are two types of interaction with it: with a webcam, that detects the smallest cheek movements, or with a trigger, represented by the F12 keyboard key. I tested the webcam detection, and it works ok, but I wanted something to use while he still has some few movements, like at the feet, jaw or any other body area. What I noticed from my research is that each person has his specific needs, so be prepared to adapt it for each environment. The software is simple and usable. Most common words and phrases become more accessible, and make things easier. The only real setting you have to worry about is the timing of the character/word selection, so it does not goes too fast. ELECTRONICSWhen researching and testing approaches, I have tested several different kinds of sensors, like touch sensors, tilt sensors, etc, and most of them were not sensitive enough.I finally tested the idea with an accelerometer and it worked very well. SENSORI tested three types of accelerometers, the MMA8452, the MPU6050 and the ADXL377. I chosed the MMA8452 because it is really easy to program, it is cheap, and for this project there is no need for a really advanced accelerometer. |
O nome do
software é ACAT e ele pode ser baixado aqui: https://01.org/acat/downloads Além do suporte para o português, ele possui suporte para diversas línguas, como inglês, francês e espanhol. O programa é de fato simples, há dois tipos de interação com ele: com uma webcam, detectando movimentos mínimos na bochecha, ou com um atuador, representado pela tecla F12 no teclado.Eu testei a detecção pela webcam e funciona bem, mas eu queria algo que ele pudesse utilizar enquanto ainda tivesse alguns movimentos, como no pé ou em outra parte do corpo. O que eu percebi na minha pesquisa é que cada pessoa possui as suas necessidades, então esteja preparado para adaptá-lo a cada situação. O software é simples e usável, As palavras e frases mais comuns são mais acessíveis, tornando tudo mais fácil. A única configuração que você deve se preocupar é com a temporização da seleção de palavras e caracteres, para que não seja rápido demais para o paciente. ELETRÔNICAQuando eu estava pesquisando e testando como fazer, testei diferentes tipos de sensores, de toque, de ângulo, etc, mas a maioria deles não era sensível o suficiente.Eu finalmente testei a idéia com um acelerômetro e funcionou muito bem. SENSOREu testei três tipos de acelerômetros, o MMA8452, o MPU6050 e o ADXL377. Eu escolhi o MMA8452 porquê ele é muito fácil de programar, é barato, e este projeto não precisava de um acelerômetro muito avançado. |

PARTS
SCHEMATICS |
COMPONENTES
CIRCUITO |
ARDUINO PROGRAMMINGThe arduino program I developed is quite simple. It just tries to detect if there was too much motion, using a median of the accelerometer values, and a threshold defined by a potentiometer. When it detects the movement, it sends a F12 key press and waits for 500 millis for debounce. |
PROGRAMAÇÃO DO ARDUINOO programa de Arduino que eu desenvolvi é relativamente simples. Tudo que ele faz é tentar se houve muita movimentação, utilizando a mediana dos valores medidos do acelerômetro, e uma margem definida pelo potenciômetro. Quando ele detecta o movimento, envia um pressionamento de tecla F12 e espera 500 millis para "debounce" (limpar espúrios) . |
| #include "elapsedMillis.h" #include "RunningMedian.h" #include "Wire.h" #include "SFE_MMA8452Q.h" int potPin = 2; int ledPin = 13; int enabledPin = 12; int tolerance = 100; int val = 0; bool blocked = false; bool pressed = false; MMA8452Q acelerometro(0x1C); RunningMedian samplesx = RunningMedian(15); RunningMedian samplesy = RunningMedian(15); RunningMedian samplesz = RunningMedian(15); elapsedMillis timeElapsed; uint8_t buf[8] = { 0 }; /* Keyboard report buffer */ void setup() { pinMode(ledPin, OUTPUT); pinMode(enabledPin, INPUT_PULLUP); digitalWrite(ledPin, LOW); Serial.begin(9600); acelerometro.init(); } void loop() { bool enabled = digitalRead(enabledPin); if (enabled) { val = analogRead(potPin); // read the value from the sensor tolerance = val * 2; if (acelerometro.available()) { acelerometro.read(); samplesx.add(acelerometro.x); samplesy.add(acelerometro.y); samplesz.add(acelerometro.z); if (!blocked) { bool tmpx = (acelerometro.x > (samplesx.getAverage() + tolerance)) || (acelerometro.x < (samplesx.getAverage() - tolerance)); bool tmpy = (acelerometro.y > (samplesy.getAverage() + tolerance)) || (acelerometro.y < (samplesy.getAverage() - tolerance)); bool tmpz = (acelerometro.z > (samplesz.getAverage() + tolerance)) || (acelerometro.z < (samplesz.getAverage() - tolerance)); if (tmpx || tmpy || tmpz) { buf[2] = 0x45; // F12 Serial.write(buf, 8); // Send keypress digitalWrite(ledPin, HIGH); blocked = true; pressed = true; timeElapsed = 0; } } } } if (pressed && (timeElapsed > 100) ) { buf[0] = 0; buf[2] = 0; Serial.write(buf, 8); // Release key pressed = false; } if (blocked && (timeElapsed > 500) ) { digitalWrite(ledPin, LOW); blocked = false; } } |
ARDUINO LIBSThere were three libs used in this project. Two can be directly installed through the IDE, and one has to be manually installed using the zip file:
ARDUINO PROGRAMMINGThis is the only part that is a little tricky in the project. I use the Arduino Uno, because I already had it here, and it is a cheap device, but its original firmware does not support HID emulation (talk to the computer as a keyboard to generate the F12 key press). For this reason, you have to execute a specific sequence of actions in order to program the arduino with another firmware. These steps are not hard, but must be executed in order.You will need these softwares:
PROGRAMMING SEQUENCE
|
BIBLIOTECAS ARDUINOForam utilizadas três bibliotecas neste projeto. Duas podem ser instaladas diretamente pela IDE, e uma tem que ser instalada manualmente através de um arquivo zip:
PROGRAMAÇÃO DO ARDUINOEsta é a única parte um pouco mais trabalhosa do projeto. Eu uso o Arduino UNO, porquê eu já tinha ele aqui disponível, e é um dispositivo barato, mas o firmware original dele não suporta emulação HID (falar com o computador como se fosse um teclado e gerar o pressionamento da tecla F12). Por esta razão, você tem que executar uma sequência específica de ações para programar o Arduino com outro firmware. Estes passos não são difíceis, mas devem ser executados em ordem.Você precisará destes softwares:
SEQUÊNCIA DE PROGRAMAÇÃO
|

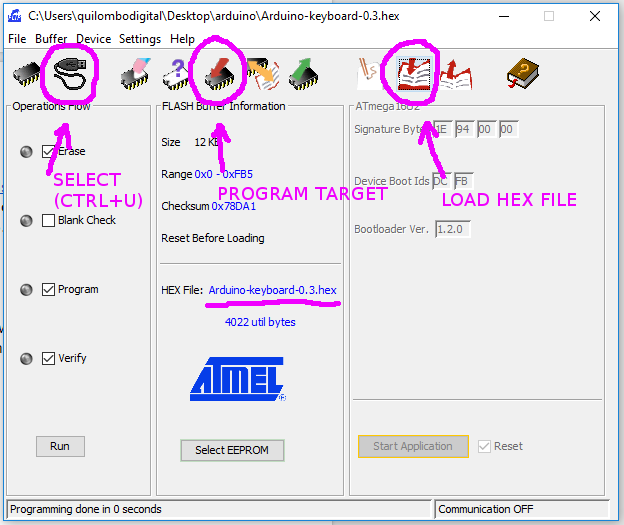
That’s it! Unplug the arduino and plug it again, it should be working.Note:If you have any problems during the programming, you can short-circuit the pins, go to DFU mode and restore the original arduino UNO firmware using the FLIP programmer, by loading the original firmware hex file and updating it. Don’t forget to “open” the device at the Flip programmer. It is easy to forget this detail.CONCLUSIONThe final result is a system that is affordable, has a very good sensitivity and I hope it can help a lot of people, with ALS or any other disabilities.If you liked this project, think a little more about you spare time, and remember that no matter what is your religion, or your beliefs, you frequently can see that good karma always came back in different ways. If you need help just contact me. Ricardo Andere de Mello quilombodigital@gmail.com
|
É isso! Desplugue o Arduino e plugue novamente que ele deve estar funcionando.Nota:Se você tiver qualquer problema durante a programação, você pode curto-circuitar os pinos, entrar no modo DFU e restaurar o firmware original do arduino UNO utilizando o FLIP programmer, carregando o arquivo de firmware original e atualizando-o. Não se esqueça de clicar no "open" da interface no FLIP programmer. É fácil esquecer este detalhe.CONCLUSÃOO resultado final é um sistema barato, com uma sensibilidade muito boa, e que eu espero ajude muitas pessoas, com ELA ou quaisquer outras dificuldades.Se você gostou deste projeto, pense um pouco mais sobre como você gasta o seu tempo livre, e lembre-se que não importa a sua religião, suas crenças, você muitas vezes pode ver que as boas ações sempre voltam para você de maneiras diferentes. Se precisar de ajudar basta me contatar. Ricardo Andere de Mello quilombodigital@gmail.com |