 |
 |
ATX VARIABLE BENCH POWER SUPPLYRicardo Andere de MelloINTRODUCTIONThis is a common project for electronic students.I already had many type of bench power supplies, always reusing old ATX power supplies I had around. In this project I decided to show something different, a VARIABLE bench power supply. The project is simple and easy to be done, with two independent power sources capable of a 5A load, enough for most projects. |
FONTE DE BANCADA REGULÁVEL USANDO FONTE ATX DE PCRicardo Andere de Mello INTRODUÇÃOEste é um projeto muito comum para quem é iniciante em eletrônica.Eu já tive vários tipos de fontes de bancada, sempre reutilizando fontes de PCs antigos que eu tinha jogado em algum canto. Neste projeto eu resolvi mostrar como fazer algo diferente, uma fonte de bancada REGULÁVEL. O projeto é bem simples e fácil de ser executado, ele prevê duas saídas independentes com capacidade de fornecer 5A, suficiente para a maioria dos projetos. |
| |
|
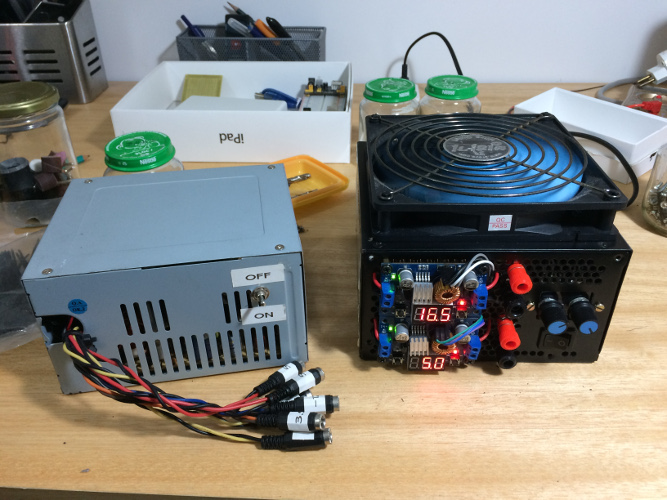
PARTS
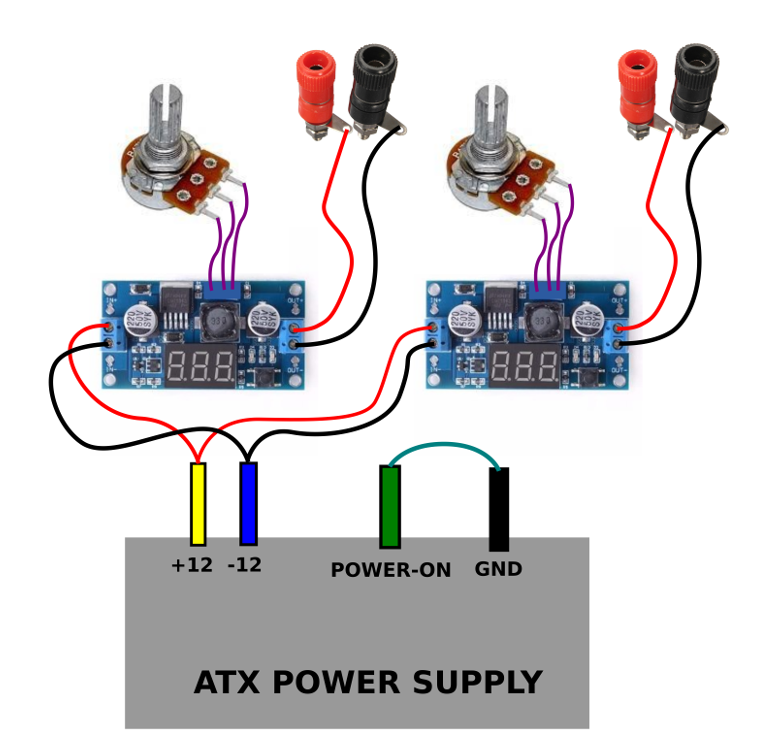
SCHEMATICS |
COMPONENTES
CIRCUITO |
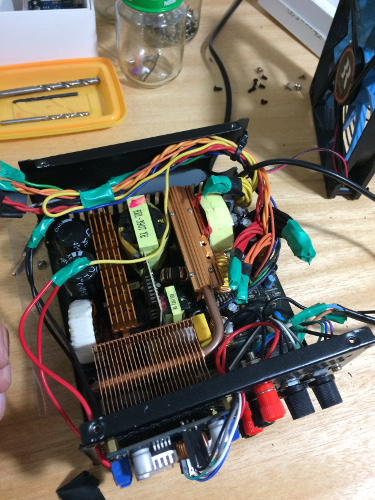
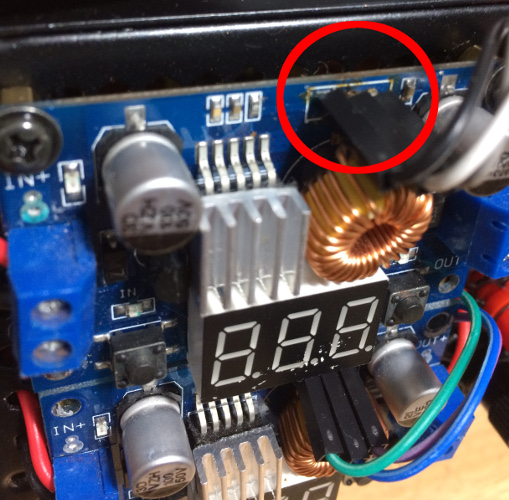
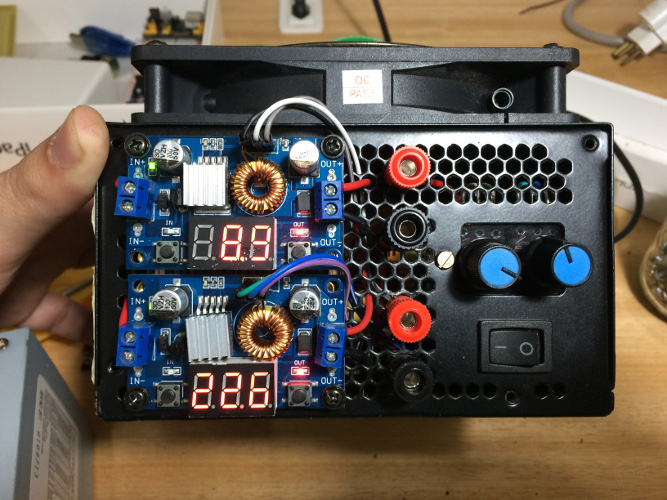
BUILDINGAs you can see at the above picture, there are only a few connections to be made, so I will focus in explaining some building details. You should read everything first before starting the project.VOLTAGE REGULATOR PREPARATION The voltage regulator has a mini potentiometer in it, but we will use our own potentiometer to control it. For this reason you need to first remove the original potentiometer and weld three wires that will be used at the external potentiometer. In my case, I welded three pins, to allow to connect and disconnect the wires, but this is optional. WIRE CUTS When you open the power supply and start the work, you will notice that there are many wires you will not use. You can cut all the wires and leave them with 5cm, except two of each color, that you can leave long. ADAPT YOUR IDEA TO THE POWER SUPPLY SHAPE Each power supply has its own internal and external characteristics. In my case, I decided to use the power supply´s back for several reasons. The first reason is that there was already a on/off button, that would be faced to the front. Another reason were the little holes that helped to attach things. My only work was to remove the power plug from the front, use the hole to place the potentiometers using a small piece of acrylic I had here, e pass the enery cable through a hole in the other side. CHECK INTERNAL SPACE Power supplies usually have very tight space inside. Since you already passed byt the wire cut step, you will notice you earned a lot of space with that, but yet, depending on your design, the space may not be enough. In my design, what helped was to move the cooler to outside the power supply. A lot of more internal space and I think it became even more beautiful. TEST THE PROJECT FIRST Before start to drilling the power supply body, place things inside, make a test and connect the wires at the voltage regulators, like in the drawing, and use a multimeter to check if it is working. It will be no fun if at the end of the project you find out that used power supply you have chosen is burned. |
MONTAGEMComo pode ser observado na figura, são poucas as conexões a serem feitas, portanto eu vou me concentrar em explicar alguns detalhes da construção. Eu aconselho a ler tudo antes de sair fazendo direto.O regulador de tensão possui um mini potenciômetro nele, mas nós vamos usar o nosso próprio para controlar o regulador. Por este motivo, você deve primeiro remover o potenciômetro original da placa, e soldar três fios, que serão utilizado para conectar ao novo potenciômetro. No meu caso, eu coloquei pinos nos buracos, para permitir conectar e desconectar, mas isto é opcional. CORTE DOS FIOS Quando abrir a fonte e começar o trabalho, você vai perceber que há muitos fios que você não vai utilizar. Você pode cortar todos estes fios e deixá-los até com 5 cm, deixando apenas dois de cada cor mais compridos. ADAPTAR A SUA IDÉIA PRIMEIRO AO FORMATO DA FONTE Cada fonte ATX possui as suas características internas e externas. No meu caso, eu preferi utilizar a parte de trás da fonte por vários motivos. O primeiro motivo é que já possuia um botão de liga e desliga, que ficaria voltado para frente. Outro motivo foi o fato de ter pequenos furos que facilitavam eu fixar as peças. O meu único trabalho foi retirar o plugue da tomada da frente, usar o buraco para colocar os potenciômetros, usando um pequeno pedaço de acrílico que tinha por aqui, e passar o cabo de energia por um furo pelo outro lado. VERIFICAR BEM O ESPAÇO INTERNO As fontes costumam ser muito apertadas por dentro. Como você já deve ter passado pela etapa de corte de fios, vai perceber que ganha bastante espaço com isto, mas mesmo assim, dependendo do seu design, o espaço pode não ser suficiente. No meu design o que ajudou foi mover o cooler para fora da fonte. Ganhei um monte de espaço interno e achei que ficou até mais bonita. TESTE O PROJETO ANTES Antes de começar a furar a carcaça, colocar as coisas dentro, faça um teste e ligue os fios nos reguladores de tensão, como no esquema, e use um multímetro para ver se está tudo funcionando. Não vai ser nada divertido se quando chegar no final do projeto descobrir que aquela fonte usada que você havia pegado está queimada... |
CONCLUSIONI did not gave building details on purpose, because this would make you anxious, and when you started to work in a completely different power supply, you would try to do the same steps and would fail miserably.The way it is, I have just shown the way to you, and you still need many creativity to make it work. In either case, this is the funny part. :) If you need help just contact me. Ricardo Andere de Mello quilombodigital@gmail.com
|
CONCLUSÃOEu não quís dar muitos detalhes da construção de propósito, pois isso ia deixar vocês com uma expectativa, e quando vocês fossem trabalhar numa fonte que fosse completamente diferente, iam tentar fazer as mesmas coisas e nada ia dar certo.Do modo como está, eu apenas mostrei o caminho para vocês, e ainda precisa de muita criatividade da parte de vocês para fazer com que funcione. De qualquer maneira, é justamente essa a parte divertida do projeto. :) Se precisar de ajuda é só falar. Ricardo Andere de Mello quilombodigital@gmail.com |